Being in the business of database management, it’s hard for me to admit that I’ve lost personal data, but after riding the storm in more occasions than I can remember or care to know, I wouldn’t be honest if I didn’t stress over and over again the fragile nature of XXI century storage media and the importance of timely backups.
To make sure data loss is reduced to a minimum, I’m trying to apply redundancy to data storage. In my closet I keep a Drobo and a customized NAS server that mirrors it. The NAS server runs on a HP N40L micro tower with NAS4Free configured with a ZFS pool that duplicates (byte by byte) the Drobo FW-800 RAID drive and which is attached to a Mac Mini Server over Firewire 800. The Mac Mini runs iTunes, Plex, and various other services of OS X Server. The Drobo FW-800 is the primary storage for all of our family’s music, home videos, photos, movies and TV shows, documentaries and educational titles, audio books and ebooks, games, user data, you name it. + – 5TB worth of data.
Both units, the Drobo and the HP N40L, have identical disk-set configurations and data volumes that are kept in sync with ChronoSync running off the Mac Mini. This arrangement appears to be working out for us, but HDDs will fail and will need to be replaced. And here’s where a few notes I found helpful, may as well come in handy, if you happen to be running a FreeBSD-based NAS with ZFS pools.
In most cases, an HDD might need replacing for one of two reasons:
(a) The root pool is too small and you want to use a larger disk to increase capacity
(b) A root pool disk is failing and you have to replace it, yesterday. (It’s not my case, but in a non-redundant pool, if the disk is failing so that system startup is not possible, you’ll have to boot up from alternate media, CD, flash drive, or even over the network, before you can replace a disk)
The procedure is simple, but the steps need to be in sequence. I found that it’s smart to write out procedures before attempting them on live systems. The main reason being that if any errors or unexpected scenarios occur, you can determine exactly what went wrong and where. So…
(1) Backup all data on the ZFS pool. If anything goes awry, you can fall back to restoration from backups. My ZFS pool is called ‘store’.
(2) Issuing a spool status command will report on the drives and their status. In my case the drive I had to replace was ada2.
(3) zpool offline store ada2
(4) Remove the disk drive from its bay. Not my case, but if your system supports hot-swapping, FreeBSD will detect physical removal of the device; see dmesg for indicators.
(5) Insert the new disk drive into its bay and wait a few seconds for it to spin up. Again, not my case, but in hot-swappable systems FreeBSD will detect physical insertion of the new device without manual intervention; see dmesg for indicators
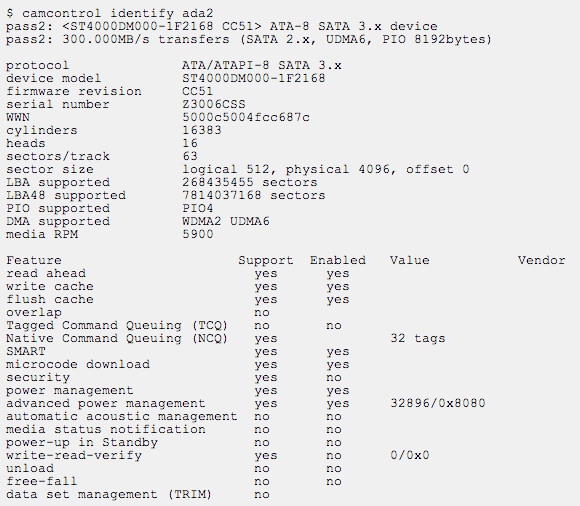
(6) camcontrol identify ada2 – check the drive serial number (and in this case the drive model number) to make sure things are different enough to ensure drive detection
(7) zpool online store ada2 – depending on the type of hardware you are using, you may or may not have to ‘online’ or reconfigure the replacement disk after it is inserted. On my system I had to ‘online’ it explicitly.
![]()
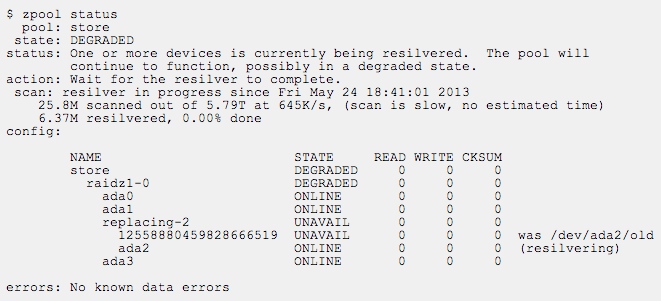
(8) zpool replace store ada2
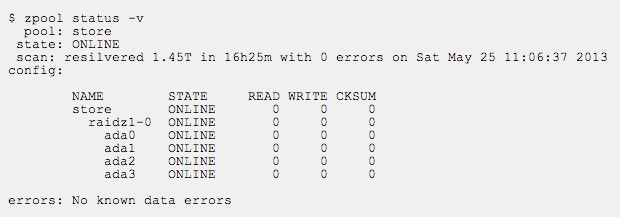
(9) zpool status
(10) Wait for the resilvering (rebuilding) process to finish and you’re done! In my case a 4TB drive took almost 16 and 1/2 hours to complete.
If you need to replace more than one disk, just repeat the process from the beginning. It’s really not that hard, is it? Good luck.
Note 1:
Prepare the drive
Deleting MBR slices/partitions
# gpart show ada1
=>       63  976773105  ada1  MBR  (465G)
         63  976773105     1  freebsd  [active]  (465G)

# gpart show ada1s1
=>        0  976773105  ada1s1  BSD  (465G)
          0  976773105       4  freebsd-ufs  (465G)
One MBR slice of type freebsd with one partition inside which holds UFS filesystem.
# gpart delete -i 4 adas1
ada1s1d deleted
Repeat for every partition in the slice. When the slice is empty:
# gpart destroy ada1s1
ada1s1 destroyed
# gpart delete -i 1 ada1
ada1s1 deleted
The following will delete MBR partition table. Do this if you want to switch to GPT partition scheme.
# gpart destroy ada1
ada1 destroyed
# dd if=/dev/zero of=/dev/ada1 count=1024
Deleting GPT partitions
# gpart show ada1
=>       34  976773101  ada1  GPT  (465G)
         34  976773101     1  freebsd-ufs  (465G)
One GPT partition covering entire drive.
# gpart delete -i 1 ada1
ada1p1 deleted
Repeat for other GPT partitions you have. If you want to switch to MBR delete the table:
# gpart destroy ada1
ada1 destroyed
# dd if=/dev/zero of=/dev/ada1 count=1024
Note 2:
To create .dep
gnop create -S 4096 /dev/adaX