Preparation
Create OU for RDS Server in Active Directory. Create security group for users who will use Remote Desktop Host (i.e. RDS Users). Create GPO (i.e. RDS Server Lock Down). In Security Filtering delete Authenticated Users, add RDS Server Computer Account, and the security group created in previous step.
Filter using security groups
Updated: January 21, 2005
Applies To: Windows Server 2003, Windows Server 2003 R2, Windows Server 2003 with SP1, Windows Server 2003 with SP2
To filter using security groups
- Open Group Policy Management.
- In the console tree, double-click Group Policy Objects, which contains the Group Policy object (GPO) to which you want to apply security filtering (console tree location is: Forest name/Domains/Domain name/Group Policy Objects).
- Click the GPO.
- In the results pane, on the Scope tab, click Add.
- In the Enter the object name to select box, type the name of the group, user, or computer that you want to add to the security filter. Click OK.If Authenticated Users appears in the Security Filtering section of the Scope tab, select this group and click Remove. This will ensure that only members of the group or groups you added in step 5 can receive the settings in this GPO.
Notes
- You must have Edit settings, delete, and modify security permissions on the GPO to perform these procedures.
- The settings in a GPO will apply only to users and computers that are contained in the domain, organizational unit, or organizational units where the GPO is linked, and that are specified in, or are members of a group that are specified in Security Filtering. You can specify multiple groups, users or computers in the security filter for a single GPO.
- You can also perform this procedure or a related task by using one or more of the sample scripts included with Group Policy Management. For more information, see “Scripting Group Policy tasks” in Related Topics.
Information about functional differences
- Your server might function differently based on the version and edition of the operating system that is installed, your account permissions, and your menu settings. For more information, see Viewing Help on the Web.
Configure users who can connect to the server remotely:
Log in to RDS Server >>> Run >>> control system >>> Remote Settings >>> Remote tab >>> Select users >>> Delete any groups/users >>> Add security group for RDS users
Disable Server Manager Pop Up at user log on:
On RDS Server open Task Scheduler. Navigate to Task Scheduler Library\Microsoft\Windows\Server Manager. Disable task “ServerManager” which triggers at log on of any user.
Configure Group Policy for RDS Server Lock Down
Loopback Processing
[Computer Configuration\Policies\Administrative Templates\System\Group Policy]
Configure user Group Policy loopback processing mode: Enable – Merge
This policy setting directs the system to apply the set of Group Policy objects for the computer to any user who logs on to a computer affected by this setting. It is intended for special-use computers, such as those in public places, laboratories, and classrooms, where you must modify the user setting based on the computer that is being used.
If you enable this setting, you can select one of the following modes from the Mode box:
“Replace” indicates that the user settings defined in the computer’s Group Policy Objects replace the user settings normally applied to the user.
“Merge” indicates that the user settings defined in the computer’s Group Policy Objects and the user settings normally applied to the user are combined. If the settings conflict, the user settings in the computer’s Group Policy Objects take precedence over the user’s normal settings.
Disable Control Panel Items
[User Configuration\Policies\Administrative Templates\Control Panel]
Hide specified Control Panel items: Enable
This setting allows you to display or hide specified Control Panel items, such as Mouse, System, or Personalization, from the Control Panel window and the Start screen. The setting affects the Start screen and Control Panel window, as well as other ways to access Control Panel items, such as shortcuts in Help and Support or command lines that use control.exe. This policy has no effect on items displayed in PC settings.
If you enable this setting, you can select specific items not to display on the Control Panel window and the Start screen.
To hide a Control Panel item, enable this policy setting and click Show to access the list of disallowed Control Panel items. In the Show Contents dialog box in the Value column, enter the Control Panel item’s canonical name. For example, enter Microsoft.Mouse, Microsoft.System, or Microsoft.Personalization.
Add following items to the disallowed Control Panel items:
Microsoft.AdministrativeTools
Microsoft.AutoPlay
Microsoft.ActionCenter
Microsoft.ColorManagement
Microsoft.DefaultPrograms
Microsoft.DeviceManager
Microsoft.EaseOfAccessCenter
Microsoft.FolderOptions
Microsoft.iSCSIInitiator
Microsoft.NetworkAndSharingCenter
Microsoft.NotificationAreaIcons
Microsoft.PhoneAndModem
Microsoft.PowerOptions
Microsoft.ProgramsAndFeatures
Microsoft.System
Microsoft.TextToSpeech
Microsoft.UserAccounts
Microsoft.WindowsFirewall
Microsoft.WindowsUpdate
Microsoft.DateAndTime
Microsoft.RegionAndLanguage
Microsoft.RemoteAppAndDesktopConnections
Install Application On Remote Desktop Server
Java
Flash Player
Remove Administrative Tools and Powershell
Restrict access to Administrative tools
- Open RDS Lock Down Group Policy.
- Navigate to Computer Configuration >>> Policies >>> Windows Settings >>> Security Settings
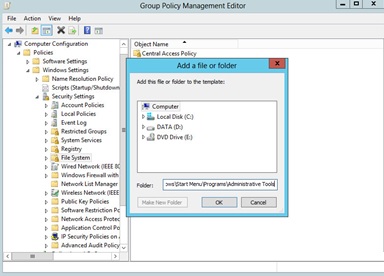
- Right click on File System, choose Add File… .
- In the Add a file or folder window, put %AllUsersProfile%\Microsoft\Windows\Start Menu\Programs\Administrative Tools in the Folder field and click OK.
- On the next window Database Security for%AllUsersProfile%\Microsoft\Windows\Start Menu\Programs\Administrative Tools\Server Manager.lnk remove Users and check that Administrators have Full Access
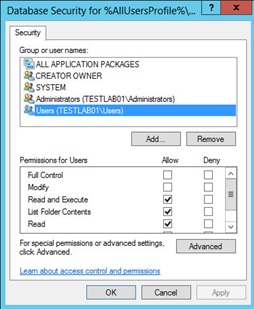
- Do the same for PowerShell shortcut (+ delete Creator Owner in database security): %AllUsersProfile%\Microsoft\Windows\Start Menu\Programs\System Tools\Windows PowerShell.lnk
- Do the same for Server Manager shortcut: %AllUsersProfile%\Microsoft\Windows\Start Menu\Programs\Administrative Tools\Server Manager.lnk
File Explorer Configuration
[User Configuration\Policies\Administrative Templates\Windows Components\File Explorer]
Enable – Restrict A, B, C and D drives only: Hide these specified drives in My Computer
This policy setting allows you to hide these specified drives in My Computer. This policy setting allows you to remove the icons representing selected hard drives from My Computer and File Explorer. Also, the drive letters representing the selected drives do not appear in the standard Open dialog box. If you enable this policy setting, select a drive or combination of drives in the drop-down list.
Enable – Remove Hardware tab
This setting removes the Hardware tab from Mouse, Keyboard, and Sounds and Audio Devices in Control Panel. It also removes the Hardware tab from the Properties dialog box for all local drives, including hard drives, floppy disk drives, and CD-ROM drives. As a result, users cannot use the Hardware tab to view or change the device list or device properties, or use the Troubleshoot button to resolve problems with the device.
Enable – Hides the Manage item on the File Explorer context menu
Removes the Manage item from the File Explorer context menu. This context menu appears when you right-click File Explorer or My Computer.
Enable – Remove Security tab
Removes the Security tab from File Explorer. If you enable this setting, users opening the Properties dialog box for all file system objects, including folders, files, shortcuts, and drives, will not be able to access the Security tab. As a result, users will be able to neither change the security settings nor view a list of all users that have access to the resource in question.
Disable Registry Modification
[User Configuration\Policies\Administrative Templates\System]
Enable – Prevent access to registry editing tools
Disables the Windows registry editor Regedit.exe. If you enable this policy setting and the user tries to start Regedit.exe, a message appears explaining that a policy setting prevents the action.
Configure Windows Installer and Windows Updates
[Computer Configuration\Policies\Administrative Templates\Windows Components\Windows Installer]
Enable: Prevent users from using Windows Installer to install updates and upgrades
This policy setting prevents users from using Windows Installer to install patches. If you enable this policy setting, users are prevented from using Windows Installer to install patches. Patches are updates or upgrades that replace only those program files that have changed. Because patches can be easy vehicles for malicious programs, some installations prohibit their use.
Enable Always: Turn off Windows Installer
This policy setting restricts the use of Windows Installer. If you enable this policy setting, you can prevent users from installing software on their systems or permit users to install only those programs offered by a system administrator. You can use the options in the Disable Windows Installer box to establish an installation setting.
[Computer Configuration\Administrative Templates\Windows Components\Windows Update]
Enable: Do not display ‘Install Updates and Shut Down’ option
This policy setting prevents users from using Windows Installer to install patches. If you enable this policy setting, users are prevented from using Windows Installer to install patches. Patches are updates or upgrades that replace only those program files that have changed. Because patches can be easy vehicles for malicious programs, some installations prohibit their use.
[Computer Configuration\Administrative Templates\Windows Components\Windows Update]
Enable: Do not display ‘Install Updates and Shut Down’ option
This policy setting allows you to manage whether the ‘Install Updates and Shut Down’ option is displayed in the Shut Down Windows dialog box.
Disable: Allow non-administrators to receive update notifications
This policy setting allows you to control whether non-administrative users will receive update notifications based on the “Configure Automatic Updates” policy setting.
Additional Policies
[Computer Configuration\Policies\Administrative Templates\Windows Components\Remote Desktop Services\Remote Desktop Session Host\Session Time Limits]
Enable (i.e. 30 minutes): Set time limit for disconnected sessions
You can use this policy setting to specify the maximum amount of time that a disconnected session remains active on the server. By default, Remote Desktop Services allows users to disconnect from a Remote Desktop Services session without logging off and ending the session.
When a session is in a disconnected state, running programs are kept active even though the user is no longer actively connected. By default, these disconnected sessions are maintained for an unlimited time on the server.
If you enable this policy setting, disconnected sessions are deleted from the server after the specified amount of time. To enforce the default behavior that disconnected sessions are maintained for an unlimited time, select Never. If you have a console session, disconnected session time limits do not apply.